A kitchen sink leak at the base can be a frustrating and potentially damaging problem. It can lead to water damage, mold growth, and wasted water, increasing your utility bills. Identifying the source of the leak is crucial for effective repair. На странице https://example.com, you can find additional resources on plumbing maintenance. This comprehensive guide will walk you through the common causes of kitchen sink leaks at the base, provide step-by-step troubleshooting instructions, and offer various solutions to fix the problem, saving you time and money on professional plumbing services.
Understanding the Common Causes of Base Leaks
Several factors can contribute to a kitchen sink leak at the base. Understanding these common causes is the first step in diagnosing and resolving the issue effectively. Here are some of the most frequent culprits:
- Loose or Damaged Faucet Connections: The connections between the faucet and the sink basin are often the source of leaks. Over time, these connections can loosen or the accompanying washers and O-rings can deteriorate, leading to water seepage.
- Corroded or Damaged Supply Lines: The supply lines that carry water to the faucet can corrode or become damaged, especially if they are old or made of low-quality materials. This corrosion can create pinhole leaks or weaken the connections, resulting in leaks at the base.
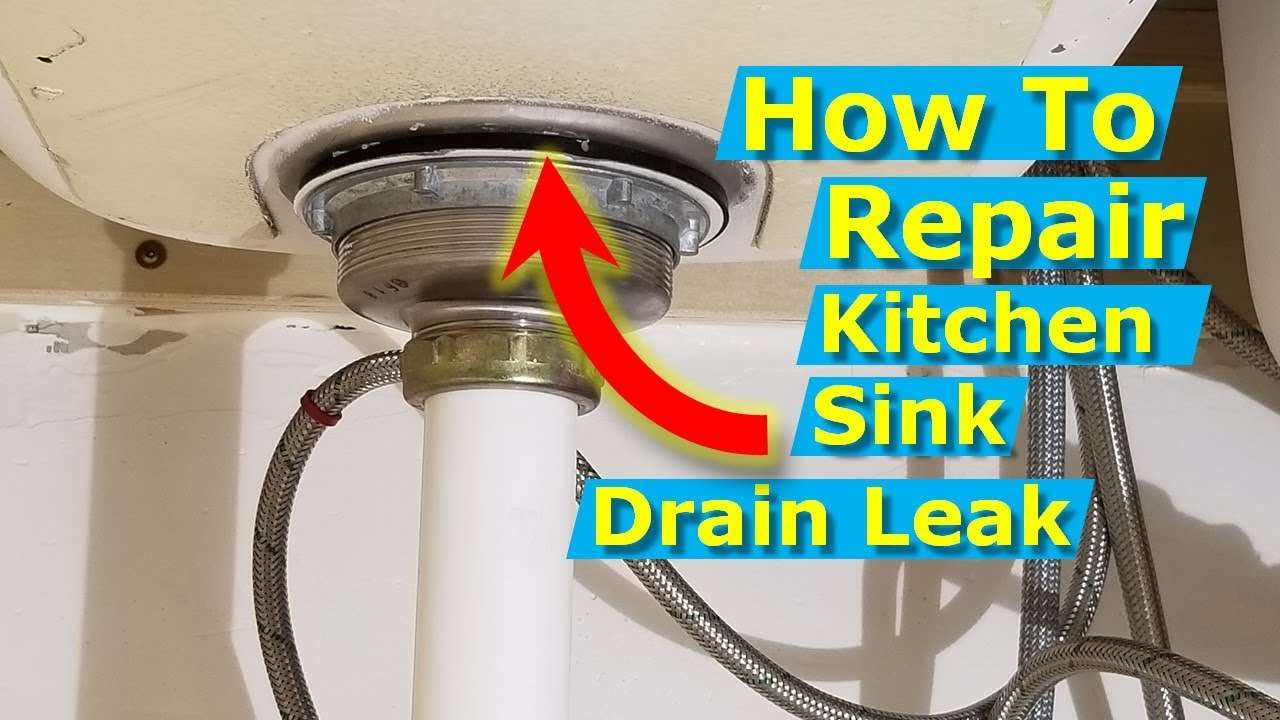
- Faulty Sink Drain Assembly: The drain assembly, including the strainer basket, tailpiece, and P-trap, is another common area for leaks. Loose connections, worn-out washers, or cracks in the drain components can all contribute to leaks.
- Deteriorated Putty or Caulk: The plumber’s putty or caulk that seals the sink to the countertop can dry out and crack over time, allowing water to seep underneath the sink and create a leak at the base.
- Clogged Drain: A clogged drain can cause water to back up in the sink, putting pressure on the drain connections and increasing the likelihood of leaks.
Troubleshooting a Kitchen Sink Leak: A Step-by-Step Guide
Before calling a plumber, try troubleshooting the leak yourself. This step-by-step guide will help you identify the source of the leak and determine the appropriate solution:
Step 1: Preparation and Safety
Before you begin, gather the necessary tools and materials. You’ll likely need:
- Adjustable wrench
- Basin wrench (for hard-to-reach connections)
- Screwdrivers (Phillips and flathead)
- Plumber’s putty or silicone caulk
- New washers and O-rings
- Towels or rags
- Bucket
- Flashlight
Also, take these safety precautions:
- Turn off the water supply to the sink. Locate the shut-off valves under the sink and turn them clockwise until they are completely closed. If you don’t have shut-off valves, you’ll need to turn off the main water supply to your house.
- Place a bucket under the sink to catch any remaining water.
- Wear gloves to protect your hands.
Step 2: Inspect the Faucet Connections
Using a flashlight, carefully inspect the connections between the faucet and the sink basin. Look for signs of water leakage, such as drips, moisture, or mineral deposits. Tighten any loose connections with an adjustable wrench. Be careful not to overtighten, as this can damage the connections.
Step 3: Check the Supply Lines
Examine the supply lines for signs of corrosion, damage, or leaks. If you find any leaks, replace the supply lines with new ones. When replacing supply lines, make sure to use the correct size and type of line for your faucet. Flexible supply lines are often easier to install than rigid copper pipes.
Step 4: Examine the Drain Assembly
Inspect the drain assembly, including the strainer basket, tailpiece, and P-trap, for leaks. Check the connections between these components for tightness. If you find any loose connections, tighten them with an adjustable wrench. If you see any cracks or damage, replace the affected component.
Step 5: Evaluate the Plumber’s Putty or Caulk
Inspect the plumber’s putty or caulk that seals the sink to the countertop. If it’s cracked, dried out, or missing, carefully remove the old putty or caulk with a putty knife or scraper. Clean the surface thoroughly and apply a fresh bead of plumber’s putty or silicone caulk. Smooth the putty or caulk with your finger and allow it to dry completely before using the sink.
Step 6: Check for Clogs
A clogged drain can cause water to back up in the sink, putting pressure on the drain connections and increasing the likelihood of leaks. If you suspect a clog, try using a plunger to clear it. If the plunger doesn’t work, you may need to use a drain snake or call a plumber.
Solutions for Fixing a Kitchen Sink Leak at the Base
Once you’ve identified the source of the leak, you can choose the appropriate solution to fix it. Here are some common solutions for different types of leaks:
Tightening Loose Connections
If the leak is caused by loose connections, simply tightening the connections with an adjustable wrench may be enough to stop the leak. Be careful not to overtighten the connections, as this can damage them.
Replacing Washers and O-Rings
If the leak is caused by worn-out washers or O-rings, replacing them with new ones is a simple and effective solution. Make sure to use the correct size and type of washers and O-rings for your faucet.
Replacing Supply Lines
If the supply lines are corroded or damaged, replacing them with new ones is the best solution. When replacing supply lines, make sure to use the correct size and type of line for your faucet. Flexible supply lines are often easier to install than rigid copper pipes. Remember, На странице https://example.com you can find specific tutorials on replacing supply lines.
Repairing or Replacing Drain Components
If the leak is caused by a cracked or damaged drain component, such as the strainer basket, tailpiece, or P-trap, you’ll need to repair or replace the component. Small cracks can sometimes be repaired with epoxy, but it’s usually best to replace the component entirely.
Reapplying Plumber’s Putty or Caulk
If the plumber’s putty or caulk that seals the sink to the countertop is cracked, dried out, or missing, you’ll need to remove the old putty or caulk and apply a fresh bead. Clean the surface thoroughly before applying the new putty or caulk.
Clearing Clogs
If the leak is caused by a clogged drain, clearing the clog will often stop the leak. You can use a plunger, drain snake, or chemical drain cleaner to clear the clog. Be careful when using chemical drain cleaners, as they can be harmful to your pipes and the environment;
Preventing Future Leaks
Preventing future leaks is always better than having to repair them. Here are some tips for preventing kitchen sink leaks at the base:
- Regularly Inspect Your Sink: Check your sink and its components regularly for any signs of leaks, corrosion, or damage.
- Tighten Loose Connections: Tighten any loose connections as soon as you notice them.
- Replace Worn-Out Parts: Replace worn-out washers, O-rings, and supply lines promptly.
- Keep Your Drain Clean: Avoid pouring grease or other debris down the drain, as this can cause clogs. Flush your drain regularly with hot water.
- Consider Professional Inspection: Have a plumber inspect your plumbing system periodically to identify and address potential problems before they become major leaks.
When to Call a Professional Plumber
While many kitchen sink leaks can be fixed with DIY methods, there are some situations where it’s best to call a professional plumber:
- If you’re not comfortable working with plumbing: Plumbing can be tricky, and if you’re not comfortable working with pipes and connections, it’s best to leave the job to a professional.
- If you can’t identify the source of the leak: If you’ve tried troubleshooting the leak yourself and you still can’t find the source, a plumber can help you diagnose the problem.
- If the leak is severe: If the leak is severe and causing significant water damage, call a plumber immediately.
- If you have galvanized steel pipes: Working with galvanized steel pipes can be difficult, and it’s often best to leave the job to a professional.
- If you’re dealing with a complex plumbing system: If your plumbing system is complex or requires specialized tools, call a plumber.
Fixing a kitchen sink leak at the base can seem daunting, but with the right knowledge and tools, many leaks can be resolved with a bit of DIY effort. By understanding the common causes, following the troubleshooting steps, and implementing the appropriate solutions, you can save yourself the cost of a plumber and keep your kitchen dry. However, don’t hesitate to call a professional when the problem is beyond your skill level or comfort zone. Remember to prioritize safety by turning off the water supply and wearing protective gear. Regular maintenance and proactive prevention are key to avoiding future leaks and maintaining a healthy plumbing system. You can find more information at https://example.com to assist you in properly resolving any plumbing issue.
Kitchen sink leaks can be frustrating, but this guide should help you navigate the process of troubleshooting and repair. Identifying the source of the leak is crucial for effective repair, and by following the steps outlined above, you should be able to resolve many common leak issues. Remember to always prioritize safety by turning off the water supply before beginning any repairs. For complex problems, professional assistance is always recommended.
Description: Learn how to troubleshoot and fix kitchen sink leaks at the base with this comprehensive guide. Find solutions and prevent future leaks in your kitchen sink.